Set up and start using your new PowerCore™ DPA-220 Amplifier in no time. Use this guide to help you connect your cables, reset your password, update your firmware and more.
Table of Contents
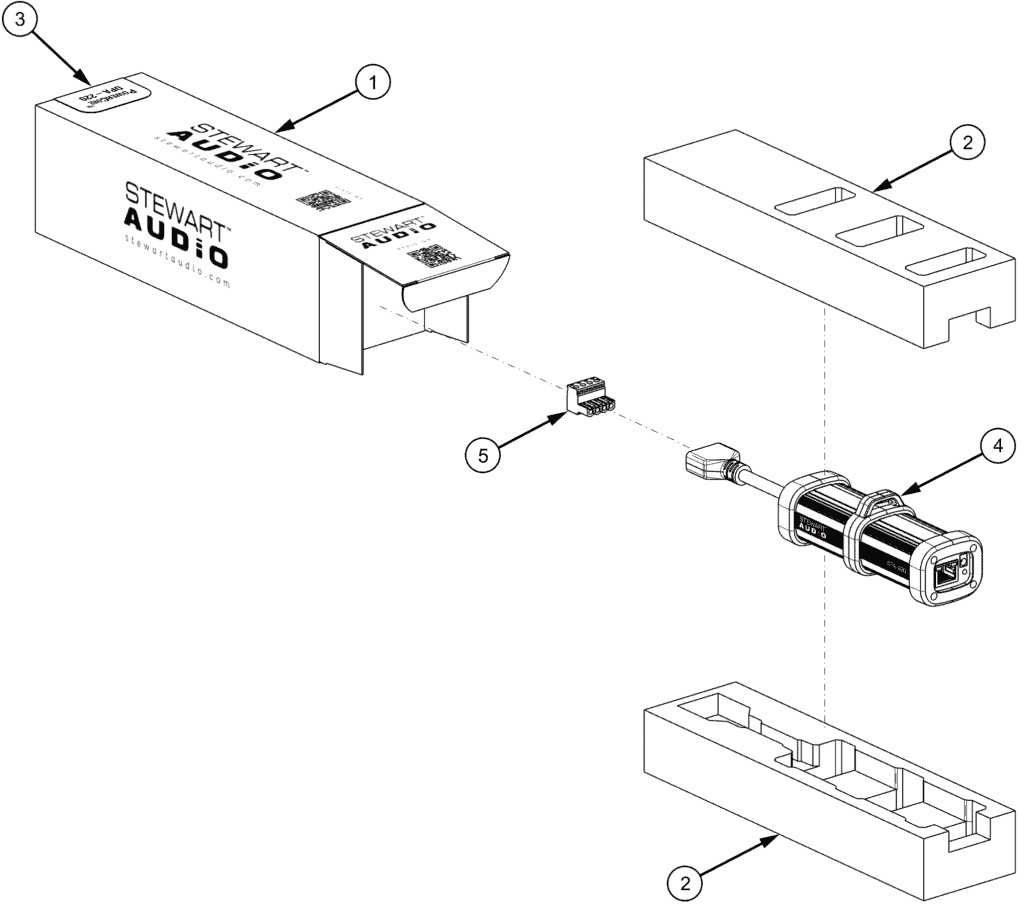
Unbox It
Packaging Box
Foam Insert
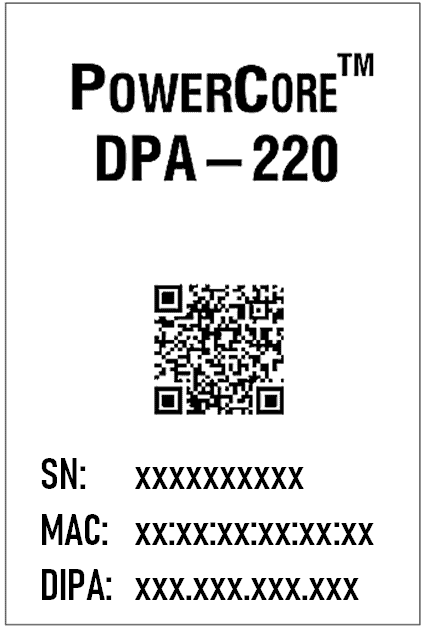
Product Information Label
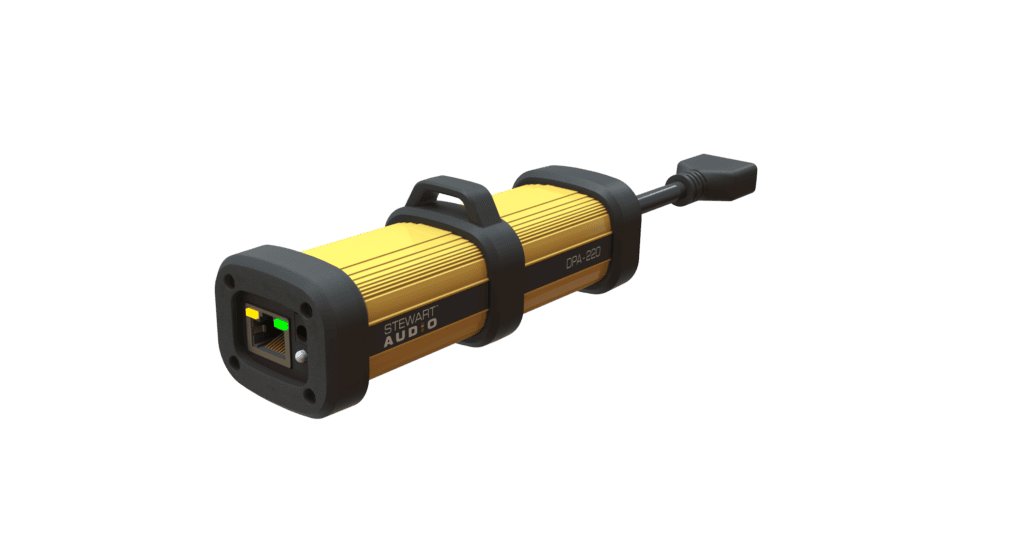
PowerCore DPA-220 Amplifier
5.00MM Euro-style Plug, Right Angle (P/N Molex 39520-0004)
Product Information Label
The information label on the box contains 3 important pieces of information:
SN: Serial number of your DPA-220
MAC: Your DPA-220’s MAC ID
Please Note: You may need this information later to access your PowerCore DPA-220 if you have forgotten your password. We recommend that you take a picture of the information on the sticker or keep a copy for your records so you can reference later.
Connect It
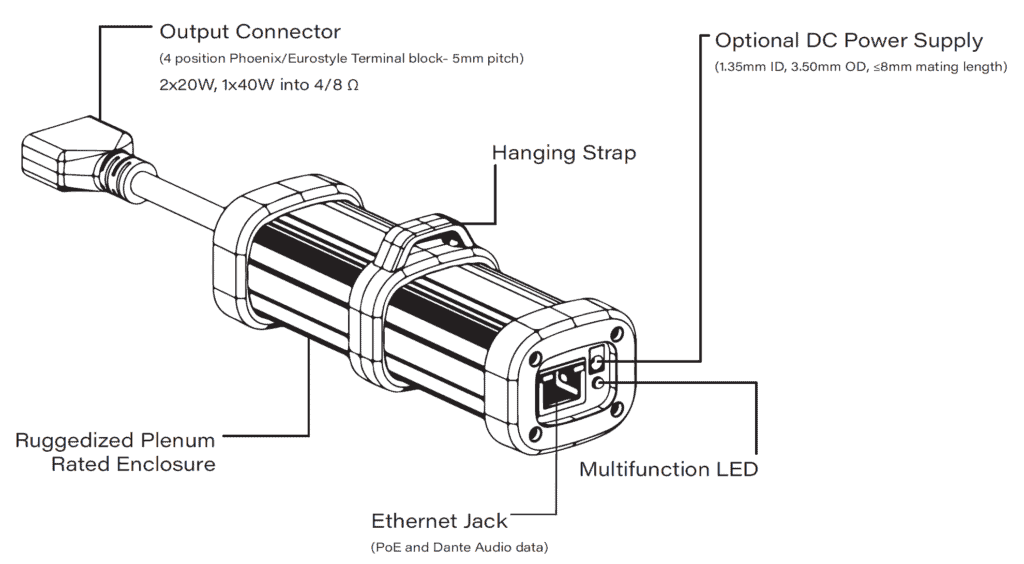
First things first- you need to connect your DPA-220. Upon inspection, you’ll find:
An Ethernet jack for power and data via a CAT5(e) or CAT6(e) cable
An optional Barrel Connector for connecting an optional external power supply
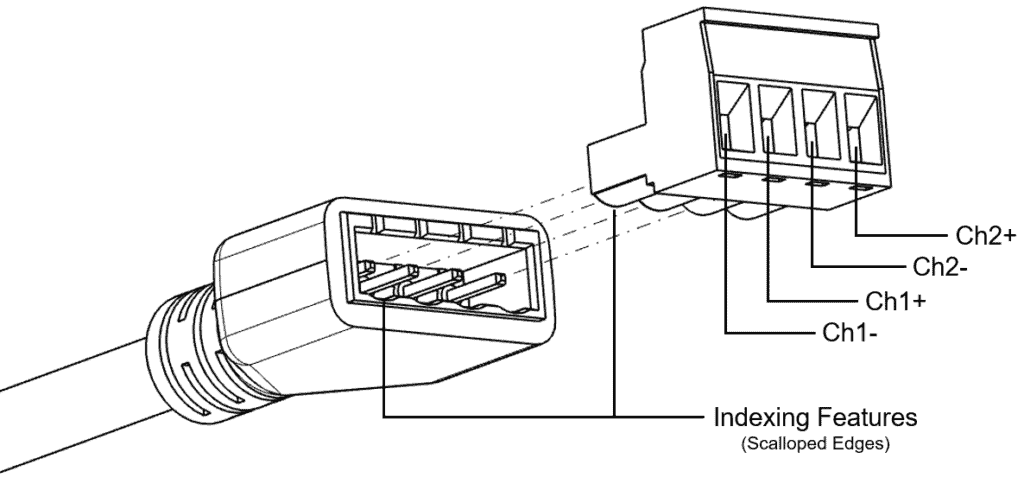
A 4-pin terminal block for 1-2 speaker connections.
See image below for details.
Speaker Connections
Please Note: You must connect the speakers to the unit before you power it up. Your DPA-220 measures the output load of the speakers upon boot-up to find out what load impedance it’s connected to. It scales internal gain levels accordingly. (You’ll find more information about this in the user manual.)
A 4-pin terminal block style connector is shipped with every PowerCore DPA-220 for you to connect speakers. For proper speaker polarity, make sure to follow the connection diagram below.
Power Connections
Power over Ethernet (PoE)
To power up your DPA-220, just connect an ethernet cable from a PoE network switch into the ethernet jack. (Please see the note above.) Alternatively, you can use a PoE injector. We’ve tested with several Power Supply Equipment (PSE) products, but here are some that we like and use often:
Upon powering up, your DPA-220 communicates with the PSE (that’s the PoE switch or PoE Injectors) to determine how much power it is allowed to demand from the PSE. After the PSE and your DPA-220 finishes the introduction and negotiation, your DPA-220 adjusts its gain to only draw the amount of power available to it.
Please Note: Your PowerCore DPA-220 can only make as much power as the switch or injector tells it is available for it to use. To get the rated power out of your DPA-220, the switch/injector must be a PoE++ rated device (i.e. 802.3bt Type 3, Class 6 or better).
External DC Supply (optional)
A barrel connector is provided if you would like to use your DPA-220 without PoE or have power supply redundancy in your system. Your DPA-220 was designed for use with a 48VDC power supply, but we designed it to accept as low as 24VDC to make it more convenient for you to source an external supply. Whatever voltage you choose, make sure it can deliver ≥55W to the ensure that your DPA-220 can deliver its rated power.
Install It
Hanging Strap Install
Because it’s plenum rated, your DPA-220 can be installed above the ceiling tile, if you’d like. We even provided a handy “hanging strap” to make it easy for you. Just connect the wire to the same structure that the ceiling tile is hung from, slide the bottom end of the wire through the hanging strap, wrap it back around itself like is done with the ceiling wire grid.
Zip-tie Install
Your DPA-220 is so light weight, it can be zip-tied to a nearby structure quickly and easily. We’d recommend zip tying over top of the two end-caps with black zip-ties for a tidy appearance. While your DPA-220 is lightweight, don’t depend on the clip on the ethernet cable you connect to support all of its weight- it must be zip-tied on both ends. You could also zip-tie around the aluminum body.
Installation Evironment
We’ve designed it to work in indoor installations (only!) that have ambient temperatures as high as 90°F, but installation in cooler environments are preferred. All DPA-220s use their aluminum body of the product to get rid of the heat generated by the electronics inside. It does a great job at that- you can tell by how warm the aluminum body is while operating. Your DPA-220 will definitely feel warm to the touch.
In any installation location, the hotter the air surrounding your DPA-220, the less heat your DPA-220 can transfer into the air and the warmer it will operate. So, don’t sweat it! It may feel warm- but it’s designed to work that way. Even then, don’t set something on your DPA-220 which has a low-melting point.
Use It
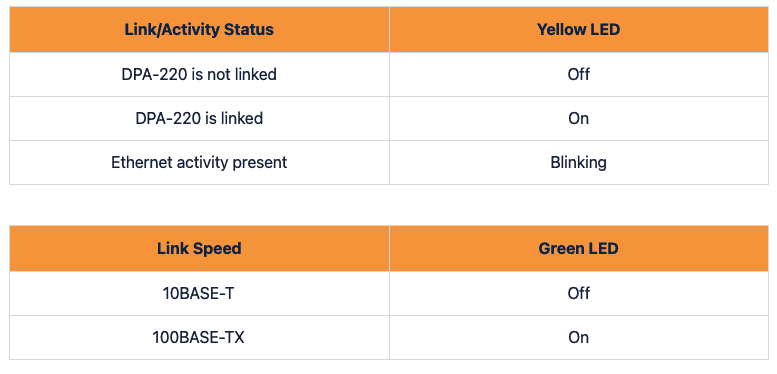
Ethernet Jack LEDs
Like other equipment, the LEDs integrated into the ethernet jack shows link status, link speed, and signal activity.
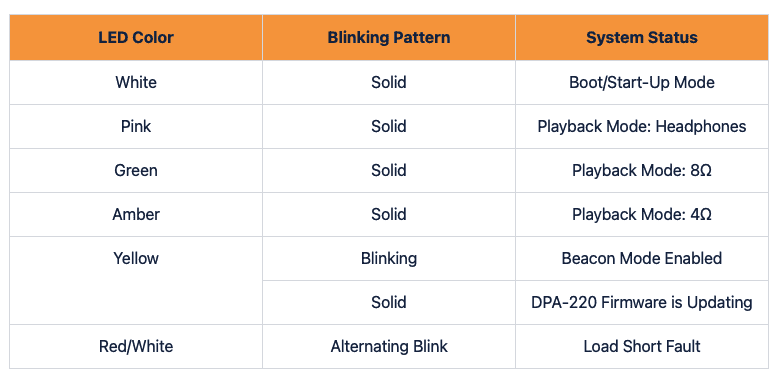
Multi-function/Multi-color LED
The color and blinking pattern of the multi-color LED is the primary method by which information regarding your DPA-220 is conveyed.
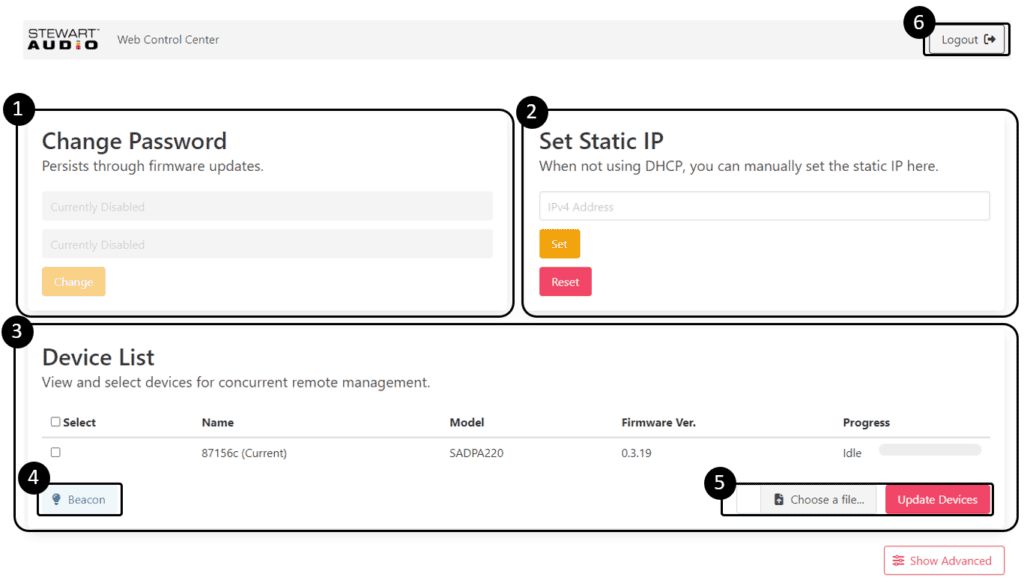
Embedded User Interface
User Interface Details
Password Change: The login password is “stewartaudio” by default, but you can change it entering in a new password and clicking the “Change” button. (See note below)
Static IP Setting: When you are not using DHCP-enabled network you must set an static IP to enter the Stewart Audio Web UI. (See tech note below)
Device list: Your DPA-220 will discover and show you all of their DPA-220 friends on the network with them. These are shown in a device list so that you can update them in mass or individually.
Beacon: This turns the multi-color LED into a flashing yellow beacon, which can help you identify which DPA-220 is which when you have multiple amplifiers.
Firmware Update Tool: The firmware update procedure is outlined below.
Logout: After you finish updating your DPA220, logout to secure your device.
Please Note: The login password your PowerCore DPA-220 will reset to the default after every firmware update. Make sure to re-secure your devices by changing the default password after every firmware update is installed.
Your DPA-220 will integrate into the Audinate Dante™ environment in the same way your other Dante devices do. Please see the DPA-220 User Manual for more information regarding integrating your DPA-220 into the Dante environment.
Update It
The firmware on DPA-220s should always be updated before they are physically installed into a project. We made it easy for you – simply follow the instructions below:
Connect your device to the same network as the DPA-220 and open a browser window
In the address bar, enter in the IP address of one of the units on the system
Identify and select which DPA-220 units on the network you would like to update then select the .SAFUP file provided to you by Stewart Audio
Click on “Upload” to begin the update (you will notice that LED will illuminate solid yellow)
The LED will turn off when the update is over and the unit will reboot
PowerCore DPA Series Firmware Update
Click the link below to access the latest firmware update for your PowerCore DPA and PowerCore DPA+ amplifiers.
PowerCore DPA Series Firmware Update
Stewart Audio uses cookies and similar technologies to improve and customize your online experience. By closing this banner or by browsing this site, you agree and accept the use of cookies.Ok